


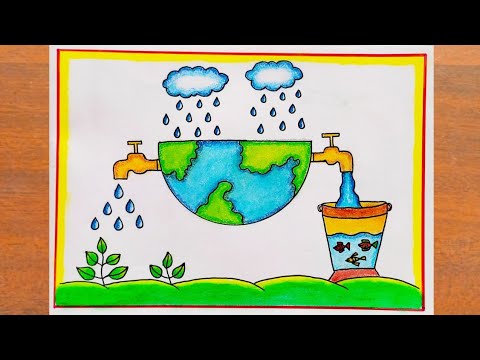
Save water drawing easy and beautiful is a fun activity for kids that allows them to express their creativity while learning about the importance of water conservation. It also helps develop their fine motor skills and teaches them more about shapes, perspectives, and colours. Here are some tips for drawing a save water drawing: 1. Start with a Basic Outline.
1. Start with a Basic Outline
Save water drawing easy and beautiful is a great way for kids to learn about conservation while doing an activity they enjoy. It also helps them develop their fine motor skills, which is an important part of their overall development. They can also learn about different shapes and colors, and they can improve their concentration skills while doing the artwork.
When kids start a water conservation drawing, they should begin by sketching out the basic outline with a pencil or crayon. This will help them plan how much space they need to draw and ensure that they include all of the important details. Once they have the basic outline, they can start filling in the details with blue watercolour. When they are done, they should let the drawing dry completely before framing it or displaying it somewhere.
When planning an outline, kids should consider the format and style that they want to use. They should decide whether they want to use a standard decimal outline or an alphanumeric outline. Decimal outlines are effective for showing relationships between main points and sub-topics, while alphanumeric outlines provide a simple way to frame ideas and categorize supporting topics. When choosing an outline format, kids should also consider the number of lines and their length. They should try to avoid using too many lines, as this can make the outline difficult to read.
3. Let the Drawing Dry
It’s so much fun to watch a drawing come alive and dance around on water. This is thanks to some really cool chemistry that dry erase markers have. They’re basically colored silicone, and just like oil, silicone hates water. When you pour water on a drawing made with dry erase marker, it unsticks from the plate and begins to float on top of it.
You can expand this activity by trying different types of drawings to see what happens. For example, try different colors of marker and various sizes of shapes. Also, make sure to use a completely clean plate when starting this experiment. Smaller shapes work best because larger ones fall apart in the process. This activity can be an easy way to teach kids about conservation and why it’s important to save water.
If you want to take your kids’ drawing skills a step further, have them draw with water color crayons instead of regular wax crayons. Then go over their drawings with a wet paintbrush to blend the lines and create a watercolor effect. Water color crayons are also more environmentally friendly than regular wax crayons, which can contain toxic chemicals. You can find these at most art supply stores or online. They’re a great option for children who want the look of watercolor without all the hassle.
4. Frame It
Save water drawing is a great way for kids to express their creativity while learning about the environment. They can use different colours to create the image and can even add extra details like people or objects. Once the painting is finished, they can let it dry completely before framing it. This will ensure that the artwork is not damaged while being displayed.
Choose a frame that complements the colors in the artwork. A frame that is too bright or too busy may draw the viewer’s attention away from the painting. You can also choose a mat with a similar shade to the artwork, which will help to add depth and dimension to the piece.
Watercolors are delicate papers, and they tend to wave slightly when they are housed in a frame. Using acid-free products can help to minimize this effect and protect the watercolor’s essence over time. Acid can cause the paper to degrade and discolor, and it is important to avoid this when displaying works of art.
One of the most beautiful ways to display a watercolor is by using a floating mount. This technique involves mounting the artwork to a smaller piece of acid-free foam core, which creates a space or “float” between the art and the mat. This is especially effective with papers that have a deckled edge, as it highlights the texture of the paper and emphasizes its character.